Once Windows Deployment Services is installed and running, locate the folder where WDS is installed.
My install is in D:\RemoteInstall.
- Rename
pxeboot.n12inD:\RemoteInstall\Boot\x64 to pxeboot.0. - Rename
abortpxe.cominD:\RemoteInstall\Boot\x86 to abortpxe.0. - Download syslinux. I used version 5.04. Your mileage may vary with other versions.
- From the syslinux archive, extract
core\pxelinux.0, com32\menu\vesamenu.c32, com32\modules\chain.c32, memdisk\memdisktoD:\RemoteInstall\Boot\x86 and D:\RemoteInstall\Boot\x64. - Rename
pxelinux.0topxelinux.comin both directories. - Create the following directories:
D:\RemoteInstall\Boot\x64\LinuxD:\RemoteInstall\Boot\x64\pxelinux.cfg(this is a directory, not a file)D:\RemoteInstall\Boot\x64\LinuxD:\RemoteInstall\Boot\x64\pxelinux.cfg(this is a directory as well)
- Open a command prompt with Administrator permissions and issue the following commands:
wdsutil /set-server /bootprogram:boot\x86\pxelinux.com /architecture:x86
wdsutil /set-server /bootprogram:boot\x64\pxelinux.com /architecture:x64
wdsutil /set-server /N12bootprogram:boot\x86\pxelinux.com /architecture:x86
wdsutil /set-server /N12bootprogram:boot\x64\pxelinux.com /architecture:x64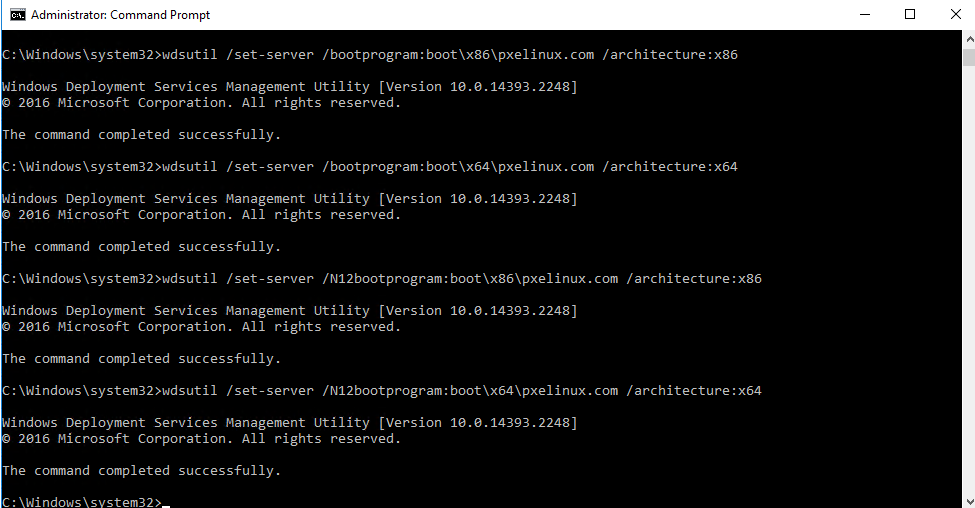
- Create a two files called default and graphics.conf in
D:\RemoteInstall\Boot\x64\pxelinux.cfgD:\RemoteInstall\Boot\x86\pxelinux.cfg
- Edit default and add the following text for the default menus:
DEFAULT vesamenu.c32
PROMPT 0
MENU TITLE PXE Boot Menu
MENU INCLUDE pxelinux.cfg/graphics.conf
MENU AUTOBOOT Starting Local System in 8 seconds
# Option 1 - Exit PXE Linux & boot normally
LABEL bootlocal
menu label ^Boot Normally
menu default
localboot 0
timeout 80
TOTALTIMEOUT 9000
# Option 2 - Run WDS
LABEL wds
MENU LABEL ^Windows Deployment Services
KERNEL pxeboot.0
# Option 3 - Exit PXE Linux
LABEL Abort
MENU LABEL E^xit
KERNEL abortpxe.0- Edit graphics.conf and add the following text for the default menus:
MENU MARGIN 10
MENU ROWS 16
MENU TABMSGROW 21
MENU TIMEOUTROW 26
MENU COLOR BORDER 30;44 #00000000 #00000000 none
MENU COLOR SCROLLBAR 30;44 #00000000 #00000000 none
MENU COLOR TITLE 0 #00269B #00000000 none
MENU COLOR SEL 30;47 #40000000 #20ffffff
MENU BACKGROUND background.jpg
NOESCAPE 0
ALLOWOPTIONS 0- Place your ISOs or image files in D:\RemoteInstall\Boot\x64 or D:\RemoteInstall\Boot\x86.
- Edit D:\RemoteInstall\Boot\x64\default or D:\RemoteInstall\Boot\x86 (depending on the architecture of your OS install) and add the following example text:
LABEL LABELNAME
MENU LABEL LABELNAME
Kernel memdisk
append iso raw initrd=FILENAME.iso
Your filename is the name of your ISO file.
Many distros will have their own way of getting this to boot correctly. For example, while Debian
provides a relatively easy path to add a network install, with Ubuntu 20.04, Canonical has taken steps
to push people to alternative ways to easily do a traditional network install. Much Googling is to be
had. See PXE config examples.